How to Check if People Discover Your Farm on Google Maps and What to Do if They Don't
Posted in Marketing on September 14, 2020
If you are growing your own microgreen farm and looking to get extra visibility from potential customers who are discovering your farm for free through Google then this blog post is for you.
And when we mention Google, we mostly refer to the placements you can be given under the map. See image below.
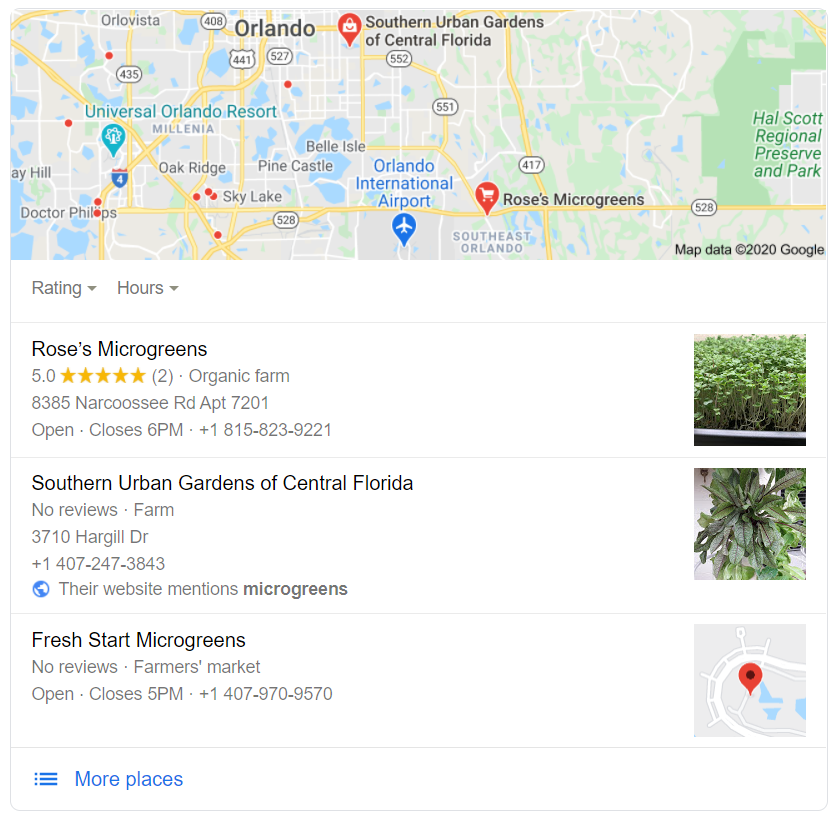
The first 3 placements get more than 50% of all the attention and it really makes sense planning a series of actions to take one of them.
Notice that by default neither of the farmers performed a paid Google campaign to get there.
The very basic reasons for that are:
1). This is an industry with relatively low competition and whatever you do it's easy to get noticed by the search engines.
2). Farmers put small extra efforts to claim or create their Google My Business profile.
Under certain circumstances Google is able to create automated Google My Business profiles that can be later claimed.
Once a profile is created it's super simple to manage it in a way it will soon stat paying off the attention and time.
There's a list with recommended practices that we are happy to share in some of the next posts. Today though, we'll be focused on the very basics like creating the profile itself.
If it's still not clear, it's your Google My Business profile that makes it possible to appear on Google Maps.
Still, you might end up having a GMB profile and be still not discoverable on the main search results page. This is because in some counties there are more than three farms to be displayed.
When there are more than three farms in the Google Maps results, Google is forced to start considering various factors to decide which farms will be placed at the first three spots and what are those that will get the rest of the positions after number three.
This is when the low competition can start plating in your favor.
Farmers equipped with a bit of patience, persistence and basic marketing knowledge can send Google some extra signals, so their listing can be ultimately placed at one of the top three positions.
Unlike microgreens farming, other local businesses or already struggling for years and Google Maps is flooded with the listings of plumbers, HVAC companies etc. They need to allocate marketing budgets and pay agencies to perform more serious local marketing campaigns to get then the results they'd expect.
So let's explore what do you need to start with Google My Business:
Google is very clear on the instructions you need to follow. You can access them here.
You can follow the same instructions below. There are extra screenshots to make the experience smoother.
Sign up for Google My Business
Note: There might be a listing for an old business at the same location where you’re registering a new business. Do not attempt to claim it. Instead, suggest an edit to have it marked as closed. Then, proceed with creating a new Google My Business listing for your business.
Step 1: On your computer, sign in to Google My Business.
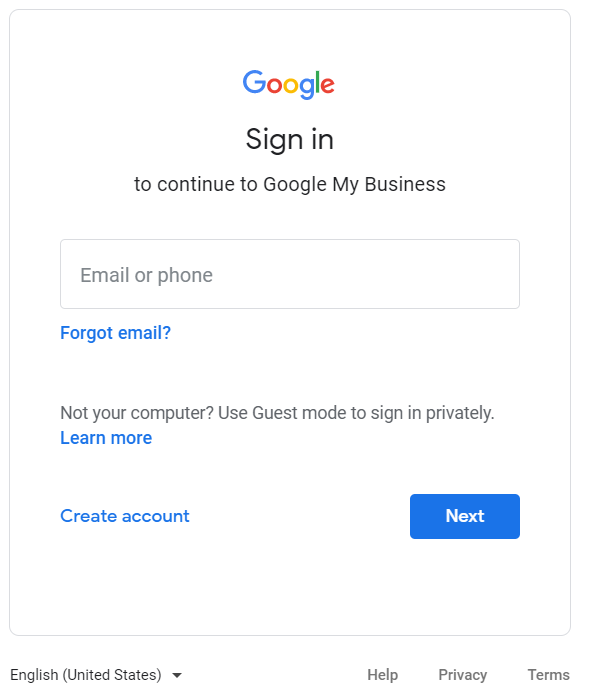
Step 2: Sign in to your Google Account, or create one.
Then, click Next. Sign up with your business email domain.
Hint: When you click Create account you'll be prompted to choose between two options. Choose: "To manage my business" if you have a legal entity like LLC.

Following the next steps is a straight forward process. Fill in your names, email address and password. You'll need to enter a verification code sent to the email you use to create the profile.
Step 3: Next step is entering your business address.
If your business doesn’t have a physical location but operates within a service area, you can list the area instead. Then, click Next.
Step 4: Choose how your business will display on Google Maps.
You have two main options:
1). Serving customers at your business address
2). Not serving customers at your business address
With Serving customers at your address you'll be required to enter your business address. Then click 'Next' and if you also serve customers outside your business address, you'll see an option to list your service areas.
In case you don't serve any customers at your business address you'll enter your business address and choose I deliver goods and services to my customers at the bottom of the page.
- If you don't serve customers at your business address:
- Enter your business address.
- At the bottom, click I deliver goods and services to my customers Next.
- List your service areas, then click Next.
Step 5: Search for and select a business category. Then, click Next.
Step 6: Enter a phone number or website URL, then click Finish.
You'll also have the option to create a free website based on your information. It’s recommended that you provide the individual phone number or store page for each location, rather than a single centralized call center.
Step 7: Select a verification option. It's recommended that you review your information before you verify it.
- To verify now, at the top, find the red banner and click Verify now.
- To verify later, click Verify later Later.
- If you’re not authorized to manage the Business Profile for the chain, find the person in your organization who’s authorized and continue the process.
Review your business information
Be sure to confirm that your business information is correct. When you verify your business information, it means all your information is ready for customers to find across Google.
To edit incorrect information, follow these steps:
- When you sign up for Google My Business, during the verification step, click Verify later Later.
- If you manage more than one location, on the left, open the Menu and click Manage locations. Then, select the location you want to edit.
- On the left, click Menu Info.
- Next to each section you want to change, click Edit . Then, enter your business information.
- Click Apply.
Now that you either claimed or created your Business Profile, it’s time to verify your business. After you verify, your business information will be eligible to display across Google.
Our best offering:

Leave a Reply